How to Truffle

Peanut Butter Truffles

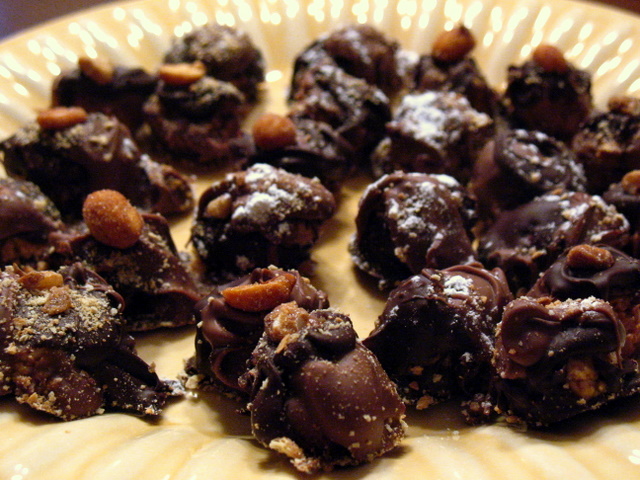
Bryan went out of town on a business trip.  I wanted to make him some peanut butter cups (because he loves peanut butter cups), but it turns out PB cups are kind of complicated.  Truffles, on the other hand, are easy.  And when B got sent home two days early, I decided the easy route was the way to go.

I’m not entirely satisfied with the truffle centers — they needed a little more PB to hold them together, or they needed to be frozen before coating or something (a couple of them started to fall apart while dipping).  And they’re definitely not pretty, but I’m not actually sure how to make pretty truffles.  I will leave that to professionals.  This recipe comes from Chow Hound, but with a few changes (I cut it in half and added some dark chocolate).  They note that the cups will keep up to three weeks in the fridge.  That is a lie–they kept a bit less than 24 hours (because B had eaten them all.  Well, I had a couple.  They were delicious).

Ingredients

(Makes 24 teaspoon-sized truffles.)

  • 1/6 c. graham cracker crumbs (I used cinnamon graham crackers crunched up in the food processor.)
  • 1/3 c. powdered sugar (sifted)
  • 1/3 c. + 2 T. (approximate) peanut butter (I used a smooth,  “natural” pb, not JIF or some crap something like that which is full of sugar.  If you’re using pre-sweetened PB, consider adjusting the amount of powdered sugar downward.  Chunky should be fine, and you can probably use almond, cashew, or sunflower seed butter.  Whatever floats your boat.)
  • 1 tsp vanilla
  • A pinch of salt – I forgot this.  But it would have been nice.
  • 1/2 c. plus a handful milk chocolate chips
  • 1/2 c. plus a handful semi-sweet chocolate chips

You’ll also need a saucepan, some heavy glass bowls, tin foil, and an ice cream scoop or large spoon.

Procedure

Part I — the middles

  1. Put the graham cracker crumbs, powdered sugar, and peanut butter in the food processor and mix it together until it has the texture of cookie dough or similar — it will clump together readily.  If it seems crumbly, add more peanut butter.
  2. Using a teaspoon, scoop mixture into teaspoon-sized balls and place on a cookie sheet or baking dish lined with foil.
  3. Put these into the fridge or freezer for at least an hour.

Part II — Tempering the chocolate

There are a lot of discussions on this–here is one of the better ones.  Basically you have to maintain the crystal structure of chocolate as you melt it, otherwise it will not solidify correctly.  People don’t want truffles to get all over their fingers.  If you’re thinking tl;dr or just don’t care about the science, I’ll tell you approximately what I did.  Otherwise feel free to use your favorite tempering method for melting the chocolates (melt them separately and keep them warm over a pot of water–don’t let the water touch the bottom of the bowl they’re in).

  1. Place chocolate in a heavy glass bowl (like Pyrex).  Put it over a pot of water and bring it (the water) to a boil.  Keep an eye on the chocolate during this period.  After a while, it should begin to look melty, but still be in the shape of the chocolate chips.
  2. Remove the bowl from the heat and mix the chocolate.  All the chips should mush together into a smooth mixture without lumps.  At this point, add a handful of chocolate chips (of the same type, milk or dark chocolate) to act as seed crystals.
  3. Because we melted the chocolate at a fairly low temperature, the seed crystal step may not be necessary, but it can’t hurt.  The residual heat should melt the newly added chips; otherwise, scoop out anything that doesn’t melt.  Put the bowl back over the boiling water briefly if the chocolate gets stiff.  You are now ready to dip.

Part III — Dipping the truffles

  1. Dip an ice cream scoop or large spoon into the chocolate.
  2. Shake it off so it is coated with chocolate.
  3. Put the truffle center in the ice cream scoop/spoon and rotate it until it is covered in chocolate.  Then put it on a foil-lined baking sheet.
  4. Do 12 in milk chocolate and 12 in dark chocolate, then use the remaining chocolate to touch up the bald spots (use the semi-sweet here on the milk chocolate truffles and vice-versa).
  5. If one of the centers starts to break up while you’re dipping it, don’t panic.  Just put it on the baking sheet and put a big dollop of chocolate on to hold it together.  It will harden into a truffle.
  6. You can top the truffles with: powdered sugar, sugared walnuts, honey-roasted peanuts, whatever strikes your fancy.  I went with a little of everything on the off-chance that if they were ugly to begin with, becoming really ugly would somehow make them cute again.
  7. This strategy was unsuccessful.
  8. When all the truffles are coated, put them into the fridge for another 30-60 minutes, until the chocolate is hard.  Because you tempered the chocolate, you shouldn’t have probTruffles!lems removing the truffles from the cookie sheet and putting them on a plate.

That’s it.  Not too hard; the active parts of the recipe only take about 30-40 minutes all together.  If you’re really patient you should make a big batch with different flavors and give them to people for Hannukah.  I’m not really patient, so I only make truffles for people I really like.

Lentil, Chickpea, and Potato Curry

I’ve now closed all the tabs for the recipes that inspired this –  I think this may have been one, maybe this as well, and I spent a goodly time browsing the archives of Indian food blogs like One Hot Stove.  What came out, while not exactly an authentic dish, is delicious and healthy.  I suppose it could be called a channa dal (I think “channa” refers to chickpeas, “dal” to lentils).  Potatoes are aloo. So this should be aloo channa dal?

I served this with chappati, the technique for which I’m still perfecting.

Continue reading “Lentil, Chickpea, and Potato Curry”

Cabbage Tomato Noodles

I enjoy making dishes with cabbage, but there’s always a problem at the end.  Most dishes require about half a cabbage to feed two (or even four) people, so what am I supposed to do with half a leftover cabbage?

This time I had half a can of diced tomatoes left over as well.  A tricky combination – I’ve seen very few recipes calling for both.  So, turning to Google, I came across this.  And it was delicious.

Here’s what I did.

Continue reading “Cabbage Tomato Noodles”

Italian Flag Lasagna

Relatively easy to assemble, cooks fast, and not too exotic for most people. What could be better for a big dinner party?

Based on this recipe from Epicurious. I doubled it and it served 11 with about 1/2 pan left over.

Ingredients

  • 3 c. ricotta cheese (I used part skim)
  • 2 10-oz. pkgs frozen chopped spinach
  • 1 c. grated Parmesan cheese
  • 1 egg
  • 4-5 T. pesto
  • salt and pepper
  • 4 c. pasta sauce
  • 16 no-boil lasagna noodles
  • 2 c. shredded mozzarella

Methodology

  1. Mix ricotta and Parmesan in the food processor. Thaw and squeeze out the spinach and mix that in. Add pesto, salt, and pepper, tasting as you go. Add the egg.
  2. Get a 9x13x2 pan and grease it. Spread 1 c. sauce on the bottom and add 4 lasagna noodles (overlap them slightly). Top with a layer of the spinach-ricotta mixture. Repeat (sauce-noodles-spinach) until there are 3 layers of pasta. Finish with a layer of noodles (the 4th) and a layer of sauce.
  3. Cover with foil. Preheat oven to 350°. Bake for 35 minutes, then take the foil off and top with mozzarella. Let it cook until warm through and cheese is brown, about 15 more minutes.

Notes

  • Ours didn’t have as much pesto as I would have liked. But B doesn’t like pesto. So, compromise.
  • Ours sat on the counter for about 25 minutes before going in. I could tell the noodles were starting to absorb some of the liquid from the sauce – they looked a little wobbly, you know? I am pretty sure it would be fine if you put it directly into the oven and that it would cook in the same amount of time, but poke it with a knife to make sure.

Simple Appetizers (Hummus and Baba Ganoush)

These are delicious and relatively quick to make.  Baba ganoush takes a little longer than hummus because you have to roast the eggplant, but you can do that ahead of time.

Hummus

People who tell you they aren’t “hummus people” are people who have only had it out of a package.  Fresh hummus is way more delicious.  This recipe is based very loosely on this one from the Fat Free Vegan blog.

Continue reading “Simple Appetizers (Hummus and Baba Ganoush)”

Cranberry (Orange) Walnut Muffins

These muffins were extremely tasty…but not very pretty.

So a few weeks (two weeks?  Three?) I had an attack of hypochondria based on some vague symptoms.  The upshot of this is that I found out that unsweetened cranberry juice is really disgusting.  And I had a lot left over.

Based on this recipe, I substituted cranberry juice for soy milk, which worked well, except that something, possibly the reaction with the baking soda/baking powder turned it kind of gray.  But they’re very tasty gray muffins, with sweet cranberries and just enough walnuts to give them some crunch.

Continue reading “Cranberry (Orange) Walnut Muffins”

Bread diaries part two: Spinach Feta Bread

So I could not have fucked this recipe up more than I did, but the bread still came out very good.  The feta could have been better distributed throughout the bread, and the loaves are a little flat (probably due to my shaping more than to them rising too long).  But overall I’d say an AB attempt.  B liked it too.

Recipe – you can read the original here.  Below is what I actually used/did.

Continue reading “Bread diaries part two: Spinach Feta Bread”

Bread Diaries

I’ve been trying to learn to bake bread.  Real bread, with yeast in it (quick breads, like banana breads, are much easier – I do those all the time).  It has been hit and miss so far.

Here’s my base recipe:

2 cups all-purpose enriched unbleached flour
1 cup bread flour (or all-purpose flour, if you do not have bread flour)
1 teaspoon yeast
1 teaspoon salt
1/8 cup sugar
1 cup warm milk
2 tablespoons butter
1/4 – 1/2 cup lukewarm water

(Taken from here.)

Directions:

1. Mix ingredients and knead for about 7-10 min.

2. Put in an oiled bowl and let it rise for 90 minutes.

3. Punch down and form loaf.  Let it rise another hour or so.

4. Put a pan of water in the bottom of the oven to create a crispy crust.  Bake at 350 for 40-45 min. until the bottom sounds hollow when you tap it.

Attempt 1: Whole Wheat Bread

I used only whole wheat flour.  I also used molasses instead of sugar.  The first rise was 90 minutes, the second was 60.

The bread came out very dense.  I should have used more yeast to compensate for the whole wheat flour.  Also, I didn’t punch it down enough and I let it rise too long on the second time, so it was pretty much done rising before it went into the oven – bad news.

Verdict: I liked the flavor, B thought it was too dense.  Eventually made good French toast.

Attempt 2: The Cheese Bread

Having learned my lessons, I used 2.5 c. white flour and 1/2 c. whole wheat.  I increased the yeast to 2 tsp. and used brown sugar instead of molasses or white sugar.  I also used buttermilk because I was out of plain.  The first rise was 90 min.  When I punched it down, I rolled it out and put cheese (shredded sharp cheddar) on the middle third, then folded the two sides over.  Then I put a little more cheese on and rolled it up.  The second rise was 45 minutes.

Verdict: Airy and awesome, with just enough bite to the crust.  If I had one complaint, it would be that the cheese wasn’t randomly distributed throughout the bread enough (should add some in during the flour mixing stage).

Attempt 3: Cinnamon Bread

Oh boy, just when I thought I had this nailed…

I again split the flour 2.5/.5, but I sprinkled the bread with whole wheat instead of white when I kneaded it (last week I used white).  Two tsp yeast, brown sugar, and plain milk instead of buttermilk.  I also put some cinnamon, cloves, and pumpkin pie spice in the flour.  Then after it was rising, I checked out another post that said that cinnamon retards the yeast, so you should use more when making a cinnamon bread!  Oops.  That said, I’m not sure I would have known the difference if I hadn’t read that.

After the first rise, I rolled it out and moistened the top with water.  Then I sprinkled on a mixture of cinnamon and white sugar (maybe 2 T. and 3/8 c.?).  I rolled it up, then decided it was too long and thin and flattened it and rolled it up again.  I think that was a mistake.  When I baked it, the sugar melted and a lot came out on the baking sheet because I didn’t adequately tuck the ends.  Also, the bread was too tall and there was an undercooked spot in the middle.  I’m not worried because it has no eggs, but it seemed unprofessional.

Verdict: B thought it was great.  I am slightly less pleased than I was last week…but I have to admit it is tasty bread, with a nice crumb and enough cinnamon to be noticeable.  I will have to come up with a better technique for rolling it.

Well, back to the drawing board.

Cabbage, Potato, and Carrot Soup

I have a lot of holiday recipes to add, but I’m going to start with this soup.  It is not a visually attractive soup, lacking the striking green of a blended broccoli soup or the popping colors of a black bean and squash chili.  Instead it’s somewhat brown and orange, since it consists of cabbage, potatoes, and carrots.  But it is tasty, easy, and relatively simple, which is nice this time of year when people feel overwhelmed by highly caloric, highly complex holiday food.

I made this a year ago and lost the recipe, so this time I used this one.

Ingredients

  • 1-2 T. olive oil
  • 1/2 onion (sweet white), minced
  • 1 clove garlic, peeled and smashed
  • 1 large potato, washed and chopped (don’t bother to peel it)
  • about 1/2 bag matchstick carrots
  • slightly less than 1/2 of a small green cabbage, chopped into small pieces
  • 3 c. water + 3 cubes veggie bouillon
  • seasoning: oregano, basil, rosemary, dill, red pepper flakes, coriander, salt, pepper

Methodology

  1. Put a large pot on the stove to heat.  Add olive oil, then veggies as you are done cutting them up.  Mix.
  2. Add water, bouillon, and seasoning (not salt and pepper yet but everything else).
  3. Cover and simmer until potatoes and carrots are tender, about 20 minutes.
  4. Turn off the stove.  Ladle the veg (as best you can – don’t have to get it all) into the Cuisinart and puree it.  Add the puree back into the broth and let it heat on low for about 5 minutes, stirring occasionally.  Add salt and pepper to taste.
  5. Serve with parmesan, bread, etc.

Notes

  • I didn’t make this very spicy.  It also could have used more salt.  Still, it was very tasty, and not as heavy as almost everything else I’ve eaten recently.  That’s a plus.

Tofu Satay

From here.

Ingredients

Marinade

  • 1 T. soy sauce
  • 1 T. sesame oil
  • 1 T. orange juice (frozen)
  • 1 T. Marsala (was out of sherry)
  • 2 tsp brown sugar
  • A few T. water (2-3)

Peanut Sauce

  • 1/2 c. coconut milk (I  used “lite”)
  • 1/4 c. chunky peanut butter (natural)
  • 1 heaping tsp red curry paste
  • 2 tsp brown sugar
  • zest of a lime
  • juice of 1/2 lime
  • 1 tsp soy sauce
  • 1 large clove garlic, minced
  • dash of cayenne pepper

Also

  • 1 16-oz brick extra firm tofu
  • 1 small bell pepper, cut into strips

Methodology

  1. Make marinade.  Cut tofu and pepper into bite-sized pieces and marinate for at least 30 minutes.  Tofu will absorb the liquid better if it has been frozen and thawed.
  2. Preheat oven to 450.
  3. Mix peanut sauce ingredients together.  Pour about 1/4 c. over the tofu and pepper and mix.  Spread on a pan large enough to create a single layer.  Bake 20-25 minutes, until tofu is dark golden brown.
  4. Serving suggestions: with rice, over spinach or lettuce if you want something green.  Spoon some of the remaining sauce over them.

This was good.  Easy too, since I didn’t have to stand over a pot and stir stuff.  I could get into this roasting thing.