This is my own pattern, but I believe in releasing these things into the wild, so I’m gonna tell you how to make it.
The original is a crib/baby quilt, so it was envisioned to be 40″x40″, which means each square is 8″ plus seam allowance (typically I use a 1/4″ seam allowance, but I don’t sew especially scant on purpose). Feel free to do your own quilt math and make it bigger or smaller. If you want like a 50×50 lap quilt, you could add a thicker border around the edge. I don’t care. It’s your quilt. Make yourself happy. You don’t have to use the same colors, either, but I will refer to the colors in this quilt when I describe the pattern.
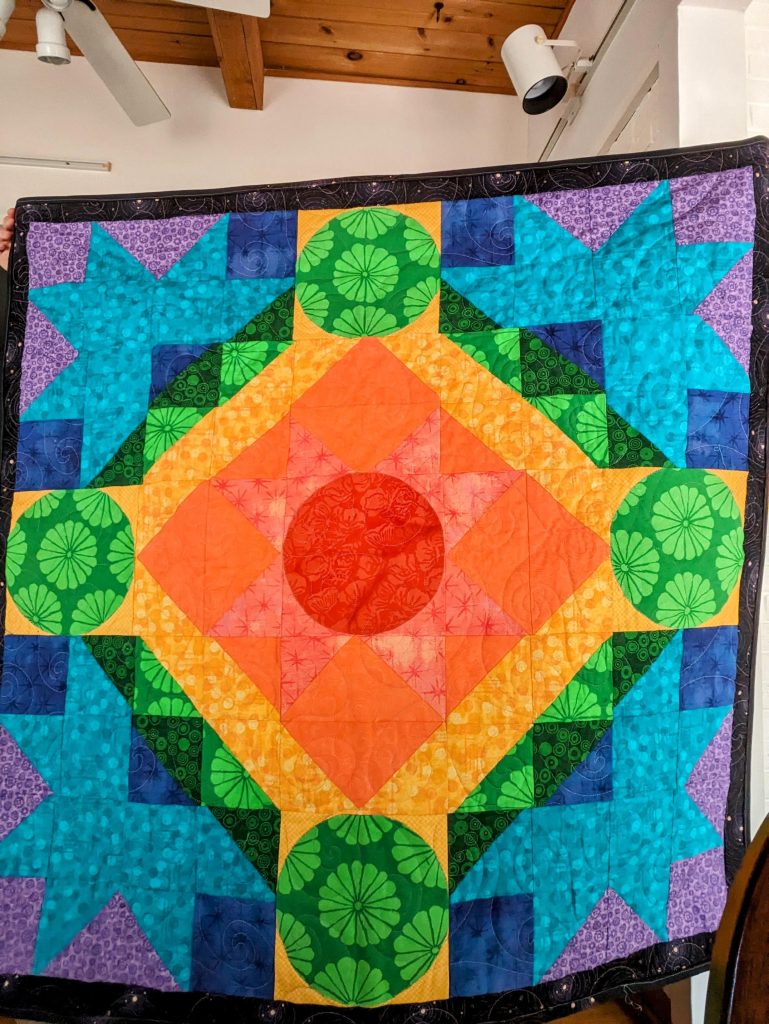
Here’s a diagram that shows the squares:
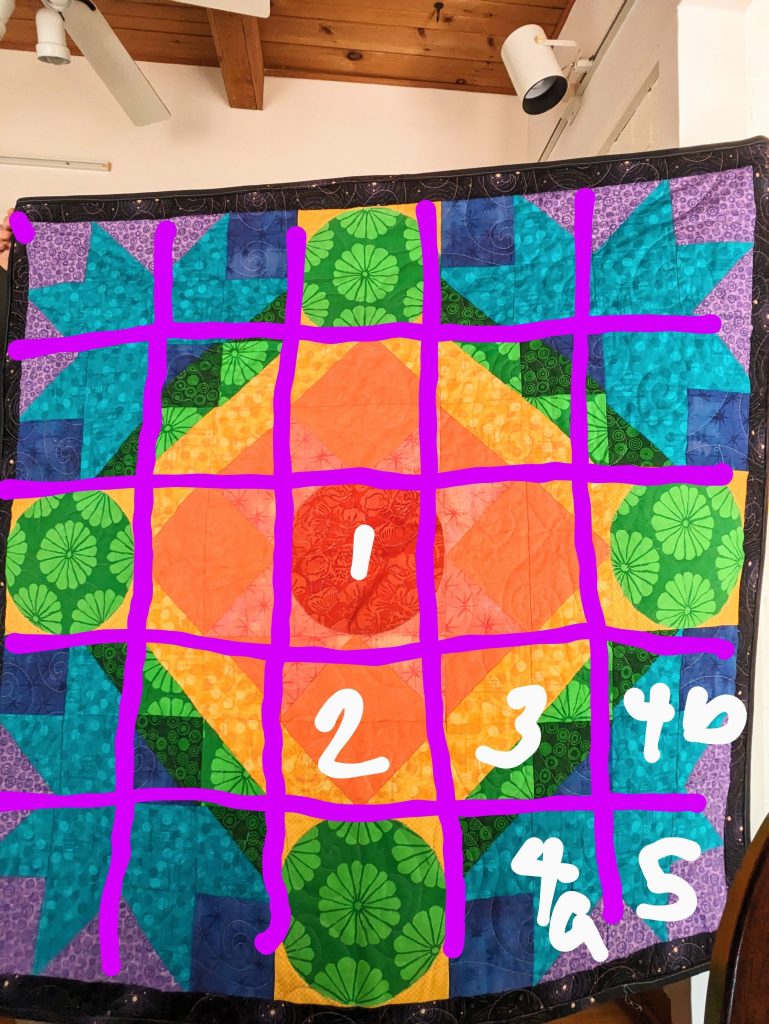
There are five types of squares that get repeated.
For type 1, I cut a circle out of the focal material and basically glued it down using an iron-on applique product. Many of these have names like “Heat and Bond.” Ask the old ladies at your quilt store if you’re not sure which one to get. After I appliqued it, I stitched around the circle with a thread in a pretty color using a zigzag stitch. Because the stitching does take up the fabric a bit, you may want to cut this square a little big (like…9″ instead of 8.5″ or even a little bigger) and then trim it if you need to. You will need five circle blocks.
For type 2, I did these as two flying geese, because there are ways to make a lot of flying geese pretty easily. You could also do it as four half-square triangles, or an orange square on point and just sew on the corners. I don’t care. I don’t think one way is inherently superior, although depending on your fabric, maybe you want fewer seams. Or maybe more seams is easier for you. You will need four blocks like this. For your 40″ quilt, each finished flying goose (before it is sewed into the square) will have to be 8.5″ by 4.5″.
For type 3, you have four half-square triangles (HSTs): one orange/yellow, two light green/yellow, and one dark green/dark blue. Since there are four of these blocks, that works out to four orange/yellow, eight light green/yellow, and four dark green/dark blue. Each finished HST, prior to being sewn together, should be 4.5″ by 4.5″. (Damn it, that’s math. I wasn’t gonna do that.)
Blocks 4a and 4b are mirror images. Each one contains a square of light blue, a square of dark blue, a dark green/light blue HST, and a light blue/light purple HST. Be careful when you assemble these–it is easy to get confused, especially if you don’t especially like rotating shapes in your head or whatever. You need four of each (so eight total with these colors). These are also 4.5″ x 4.5″ for the hypothetical 40″ quilt.
Block 5 is essentially the same: one light blue square, one light purple square, and two light blue/light purple HSTs. You need four of these, and again they’re 4.5″ x 4.5″.
I put on a dark purple border. If I’d done better math, I would have made it bigger, but whatever. I usually want at least a 2.5″ wide border; smaller than that looks a bit weird in my opinion.
Tips: Iron everything at every stage. I press my seams to the side rather than open. Spray starch if you have to. Quilt it in the way that makes you the happiest. Bind it with either more dark purple (if you have enough, I didn’t) or black (if you have enough, I didn’t), or both in some kind of random arrangement (ding).
That’s it. Easy, right?